
- Go to ADSCore
- Made in Italy

- Custom Apparel
- Most Popular
- Sublimation Ready
- $1.99 T-Shirts
- $4.99 Sweatshirts
- $5.99 Hoodies
- Track Order
Follow Us:


 All
All
 Go to Gildan
 Go to Richardson
 Go to Afton
 Go to Bella + Canvas
 Click Here To Shop
 Go to Comfort Colors
 View All
 Go to Next Level
 Go to Rabbit Skins
 Go to Jerzees
 Go to Hanes
 Go to Yupoong
 Go to Shakawear
 Go to Otto Cap
 Go to Port & Company
 Go to ADSCore
 Go for District
 Go for Sport Tek
 Go for Port Authority
 Go for dtfx
 Go to ADSCoreMade in
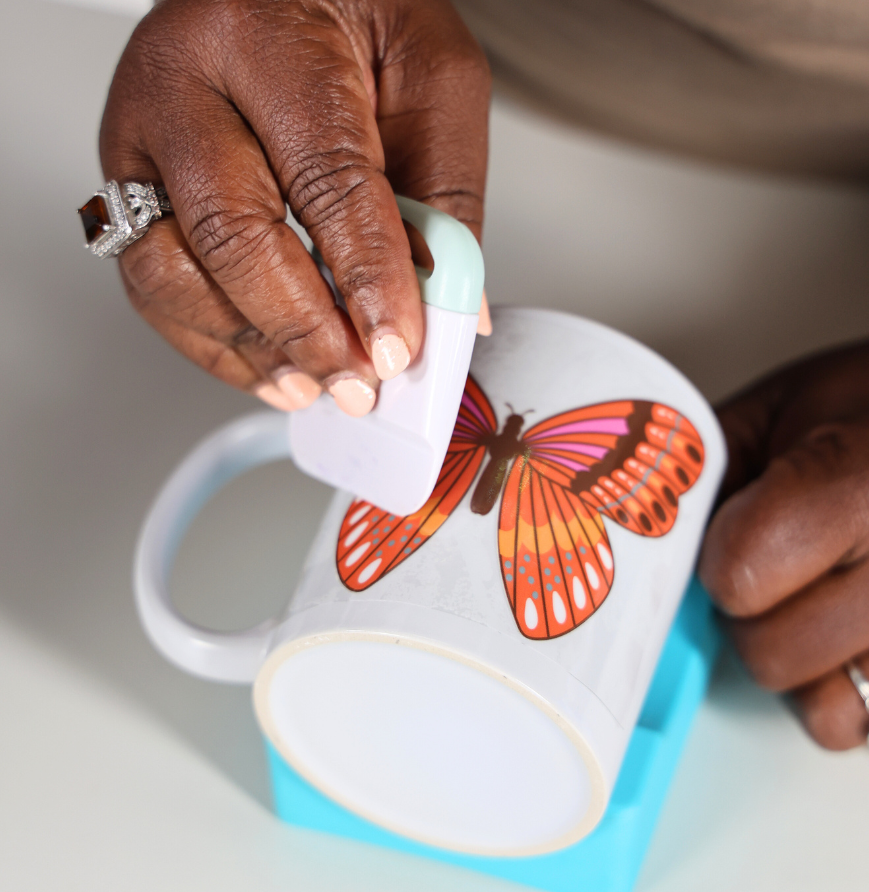
Posted by AllDayShirts on to Printing Techniques., Product Guides
UV DTF (Ultra Violet Direct-to-Film) printing is quickly becoming one of the most talked-about innovations in the custom printing industry. Unlike traditional vinyl decals, sublimation, or heat-transfer methods, UV DTF allows you to print vibrant, full-color designs directly onto a special film using UV-curable inks, which are then transferred to almost any smooth, hard surface.
The process produces high-resolution, professional-grade results that are scratch-resistant, waterproof, and fade-resistant. Whether you’re customizing tumblers, mugs, glassware, acrylic signs, phone cases, wood plaques, or product packaging, UV DTF offers an easy, no-heat application method that makes decorating nearly any product possible.
In this guide, we’ll walk you step-by-step through how to apply UV DTF transfers correctly, explain the tools and materials you’ll need, cover common mistakes, and share insider tips for business owners who want to sell UV DTF-decorated products successfully.
Before diving into the application process, it’s worth understanding why UV DTF has exploded in popularity.
UV DTF can be applied to a wide range of substrates, including:
This versatility means you can work on multiple product lines with one printing process, reducing the need for different equipment and techniques. If you’re looking for inspiration beyond drinkware, check out 20 Ideas for UV DTF That Aren’t Cups —you’ll find creative ways to apply UV DTF to products like keychains, signage, home décor, and more.
Unlike sublimation or fabric DTF printing, UV DTF doesn’t require heat presses or ovens to bond the design. This is a huge advantage for temperature-sensitive materials such as coated metals or certain plastics that could warp or melt under heat.
UV-curable inks are known for being scratch-resistant, waterproof, and UV-resistant. This makes UV DTF perfect for high-touch items like drinkware or outdoor signage, where durability is non-negotiable.
UV printers can reproduce gradients, tiny text, and vivid colors that rival traditional screen printing—without setup fees, color separations, or large minimum order quantities.
A UV DTF transfer consists of two main layers:
A-Film (Print Film) – where your design is printed in reverse using UV-curable inks, including a white ink underbase for opacity.
B-Film (Adhesive Film) – a clear, pressure-sensitive adhesive layer that allows the design to stick firmly to your substrate during application.
Once printed and laminated, the UV DTF transfer can be peeled from its backing and applied directly to your surface in one smooth step.
Before you start, gather the following:
Printed UV DTF decal (A-film with adhesive applied)
The item you’re decorating (clean, smooth surface recommended)
Isopropyl alcohol (70% or higher)
Lint-free cloth or microfiber towel
Squeegee or scraper tool
Tweezers (for small or delicate designs)
Masking tape (optional, for alignment)
A steady, dust-free workspace
A clean surface is the foundation of a long-lasting application. Oils, dust, and residue can weaken adhesion.
Wipe the area thoroughly with isopropyl alcohol.
Use a lint-free cloth to remove any particles and moisture.
Avoid touching the cleaned surface with your hands afterward.
Pro Tip: For curved items like tumblers, use a cradle or holder to keep the item steady while applying the decal.
With the backing still on, lay your UV DTF transfer on the surface to check placement.
Use masking tape to create a hinge on one side for precision.
Stand back and confirm that the design is straight and centered.
Proper alignment now saves time later—especially if you’re applying multiple decals in a production run.
Gently peel away the white backing film to reveal the adhesive side.
Pull slowly to avoid curling or lifting small elements of your design.
If the design starts to separate, lay it back down and burnish before peeling again.
Starting from one side (or the center), lay the adhesive side onto your substrate.
Smooth the decal down with your fingers or squeegee as you go.
For cylindrical objects, apply in a rolling motion to avoid wrinkles.
Use firm, even pressure with your squeegee or scraper tool to press the decal onto the surface.
Work from the center outward to remove air bubbles.
Pay extra attention to fine details and edges.
Once the decal is firmly adhered:
Slowly peel back the clear carrier film at a low angle.
If a section doesn’t release, lay the film back down and burnish again.
Inspect the surface for any bubbles or lifting edges.
Push out small air bubbles toward the nearest edge.
For stubborn bubbles, gently puncture with a pin and press flat.
Not Cleaning the Surface Properly
Even fingerprints can reduce adhesion. Always clean immediately before applying.
Applying in a Dusty Workspace
Dust can cause bumps under the decal. Choose a clean, well-lit environment.
Rushing the Application
Slow, steady application prevents wrinkles and bubbles.
Stretching the Decal
Avoid pulling on the film—allow it to naturally conform to the surface.
To extend the life of your designs and keep them looking as vibrant as the day they were applied:
Hand wash drinkware—avoid dishwashers, as high heat and strong detergents can break down adhesive over time.
Do not scrub with abrasive pads or harsh chemicals.
Avoid prolonged soaking in water.
Store in cool, dry conditions to prevent lifting or warping.
With proper care, UV DTF designs can last for years without fading or peeling.
For even easier maintenance and application, check out our new Pre-Cut Option for DTF and UV DTF Transfers —a time-saving solution that ensures cleaner edges, faster placement, and professional results every time.
If you’re offering UV DTF customizations commercially, SEO-driven marketing can help customers find your products.
Custom UV DTF transfers
How to apply UV DTF decals
UV DTF printing for tumblers
Durable custom cup decals
Full-color stickers for glassware
Post before-and-after photos on social media.
Create short video tutorials showing the application process.
Write blog posts like “10 Creative Uses for UV DTF Transfers.”
Publish FAQs about care and compatibility.
Add step-by-step application instructions to your product pages.
Use high-quality mockups to showcase designs.
Feature customer reviews highlighting durability and vibrancy.
Mastering UV DTF application opens the door to endless customization opportunities. With the ability to decorate almost any smooth surface—without heat presses—you can create professional-grade products quickly and efficiently.
By following a clean workspace setup, precise positioning, and steady application, you’ll consistently achieve flawless results. Pair these skills with smart SEO marketing, and UV DTF can become a profitable service for both small craft businesses and large-scale custom product companies.
Please email media@alldayshirts.com