The world looks a lot different than it did twenty years ago. Heck, it looks a lot different than it did three years ago. One of the big ways it looks different is the way that people work. It used to be that you went somewhere to work, got a paycheck, and did your best to live off of that paycheck. These days, around a third of Americans,
run a side hustle. Some do it because they need a creative outlet, but most people pick up a side hustle because they want some extra income.
People who write well or code well turn into freelancers. People who like dogs become dog walkers. What if you’re more crafty than that? Those people, meaning our people, invest in things like
Cricut machines and look at setting up online stores to sell their stuff. Some start
an Etsy store, while others launch independent sites. If you’re new to the Cricut crafting fold, though, it can all seem mysterious. You might rightly wonder
how to make a t-shirt with a Cricut. Fear not, because we’re here to help you make the leap from a confused newbie to a confident and experienced one.
Materials Needed (Equipment and Supplies)
If you want to make a Cricut t-shirt, you will need some essential supplies. Let’s start with a quick list and then dig a little deeper.
• Cricut Machine and accessories
• Blank T-shirts
• Iron-on vinyl
• Weeding tool
• Iron or heat press
• Surface protection
Now that you know the essentials, let’s look a little closer.
Cricut Machine
Cricut offers a whole series of machines. If you already own a Cricut Maker or Cricut Explore, you’re all set. If you’re gearing up to buy one, go with one of the more up-to-date models like the Cricut Maker 3 or the Cricut Explore 3. That ensures that the machine will work with Cricut’s Design Space app. It also means you won’t have trouble sourcing things like Cricut pens and blades for a while. You’ll also want a cutting mat for the machine.
Blank T-shirts
Next up, you need a shirt. If you’re looking to make a Cricut t-shirt for the first time, don’t overcomplicate things. Go with a plain white t-shirt. You can always get more exotic later, but white shirts can take nearly any color and take it well. You also want affordable shirts with decent durability. We recommend the following:
•
Bella Canvas 3001•
Gildan G500•
Next Level Men's CVC CrewYou can do any of these at a digestible price point, even buying in bulk. Plus, they’ll hold up well to repeated washings.
Iron-on Vinyl
You can get iron-on vinyl in sheets or in rolls. If you’re just experimenting with your first shirts, you’ll probably want to get a multipack of sheets in different colors. That gives you a chance to play around and get a feel for the process.
Once you settle on a design you like and want to produce shirts in batches, you’ll want to get your iron-on vinyl in a roll of the right color. It’ll prove cheaper for you.
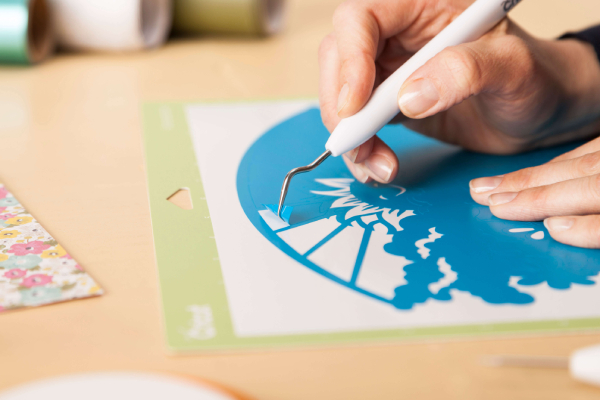
Weeding Tool
It might sound like a garden implement, but it looks a lot more like a dental tool. A weeding tool is just a small hook or point on a handle that lets your remove negative cuts from the vinyl. A negative cut is just a spot on the vinyl you remove so the shirt color can show through.
Iron or Heat Press
You need a heat source of some kind to get the vinyl to stick to the fabric of the shirt. You can do this with a basic hand iron. If you think you’ll move into making t-shirts in batches, however, you’ll want a
heat press. You can keep things in the family since Cricut also produces a line of heat presses.
Surface Protection
Since you’ll be working with an iron or heat press, you’ll need protection for your surface. You can use anything from a towel to an ironing board if you go with an iron. If you get a heat press, you want a mat designed specifically to work with your heat press.
The Process of Creating a T-Shirt
So, now you’ve got your Cricut and picked up all the materials you need. You’ve also got a space set up to actually make the shirt. Let’s dig into the process for creating your Cricut t-shirt.
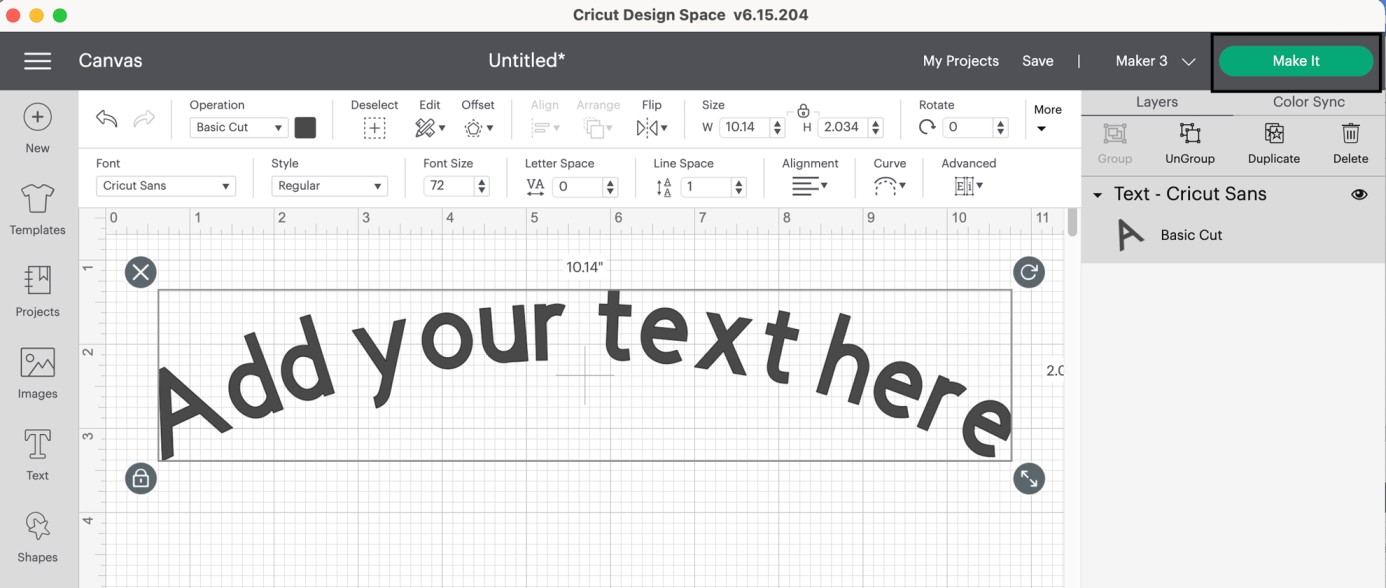
Design in "Cricut Design Space”
The Cricut Design Space app is built with creating things like t-shirts in mind. So, you get access to a set of pre-made shapes, fonts, and a size-based interface for creating your design. Why size-based? Your first task once you get your t-shirt is to measure the front. That lets you know how large you can make the design. Then, you can use the size references in the interface to scale your design size up or down appropriately.
For your first few attempts, you’ll probably want to keep it simple. Go with a short catchphrase, a shape, or a combination of shapes, or pair them up. This lets you get comfortable with the app and see how things look on the shirt later. You can level up with things like Cricut Pens once you feel solid with using the app.
Important: You will need a mirrored version of the design for cutting. You can mirror your design image right inside the Design Space app. You need this because all the cuts on the vinyl happen on the adhesive side, rather than the good side.
Cutting the Vinyl
Cutting the vinyl is one of the easier parts of the process. You can send the design directly from your phone to the Circuit machine via Bluetooth. You can also install the software on your computer and send it from there. It’s generally easier to send the design from your phone, even if you do the actual design on your computer.
When you’re using something flexible, like vinyl or vinyl print-and-cut sheets, you should put them on a cutting mat or another sturdy surface before printing. For a standard vinyl material, you’ll want it facedown on the mat. You’ll select the material for the cut inside the Design Space app, which will help determine the depth of the cut. You want to pick carefully, or you risk cutting too deeply, even with the mat. You may also need to change the cutting blade based on the material. For vinyl, you’ll typically use a fine point blade. Once you have all your settings correct, you press the cut button on the Cricut. It will cut out the design on the vinyl.
Weeding the Design
After it finishes cutting, you’ll need your weeding tool to remove the negative cut material. You typically slip the weeding tool beneath the cut and lift around the edges. For small negative cuts, you’ll often use the tool to remove the piece entirely. For larger cuts, you can often lift the vinyl along the edges with the weeding tool and then peel the rest away with your hand. When you’re done with the weeding tool, all that is left should be an exact copy of your design.
Apply the Vinyl to the T-shirt
Next, you’ll take the design and position it on the shirt. Take your time with this part. You can’t undo a badly positioned design after you add heat. If necessary, use a ruler to measure the distances from the seams of the shirt.
If you plan on using an iron, you should set the shirt up on the ironing board or towel ahead of time.
Ironing/Heat Pressing
For ironing, you should consult the manufacturer’s recommendations for heat temperature and the total time of heat application. Also, make a note of the material you’re putting the vinyl on. Those can change the heat settings and the time. For a cotton shirt, odds are good that the temperature will run around 300 degrees for about 15-30 seconds.
If you plan on using an iron, that means putting the setting at or slightly below the cotton setting. You’ll also want something to put between the vinyl and your iron. Think of a scrap of thin cloth or maybe a thin towel.
If you’re using a heat press, follow the manufacturer's instructions. In general, though, you set the temperature and time, then simply press down with or close the lid on the heat press.
TipsOne way you can make your life easier is by ironing the shirt with the heat press or the iron before you position the vinyl on the shirt. This helps ensure that the vinyl goes onto the shirt completely flat. Make sure that your iron doesn’t have any water in it. The steam can destroy the adhesive process.
Wrapping Up
As with most things, your first few tries with making t-shirts using your Cricut will prove a learning experience. Don’t expect perfection your first time out. Once you get comfortable with Design Space and the machine itself, things will go much more smoothly. Then, you can start thinking about selling your shirts.


 Go to Gildan
 Go to Comfort Colors
 Go to Afton
 Click Here To Shop
 Go to ADSCore
 View All
 Go to Bella + Canvas
 Go to Jerzees
 Go to Otto Cap
 Go to Richardson
 Go to Next Level
 Go to Rabbit Skins
 Go to Shakawear
 Go for dtfx
 Go to Yupoong
 Go to Independent Trading
 Go to Hanes
 Go to Port & Company
 Go for District
 Go for Sport Tek
 Go for Port Authority
 Go for Burnside
 Go to ADSCore